

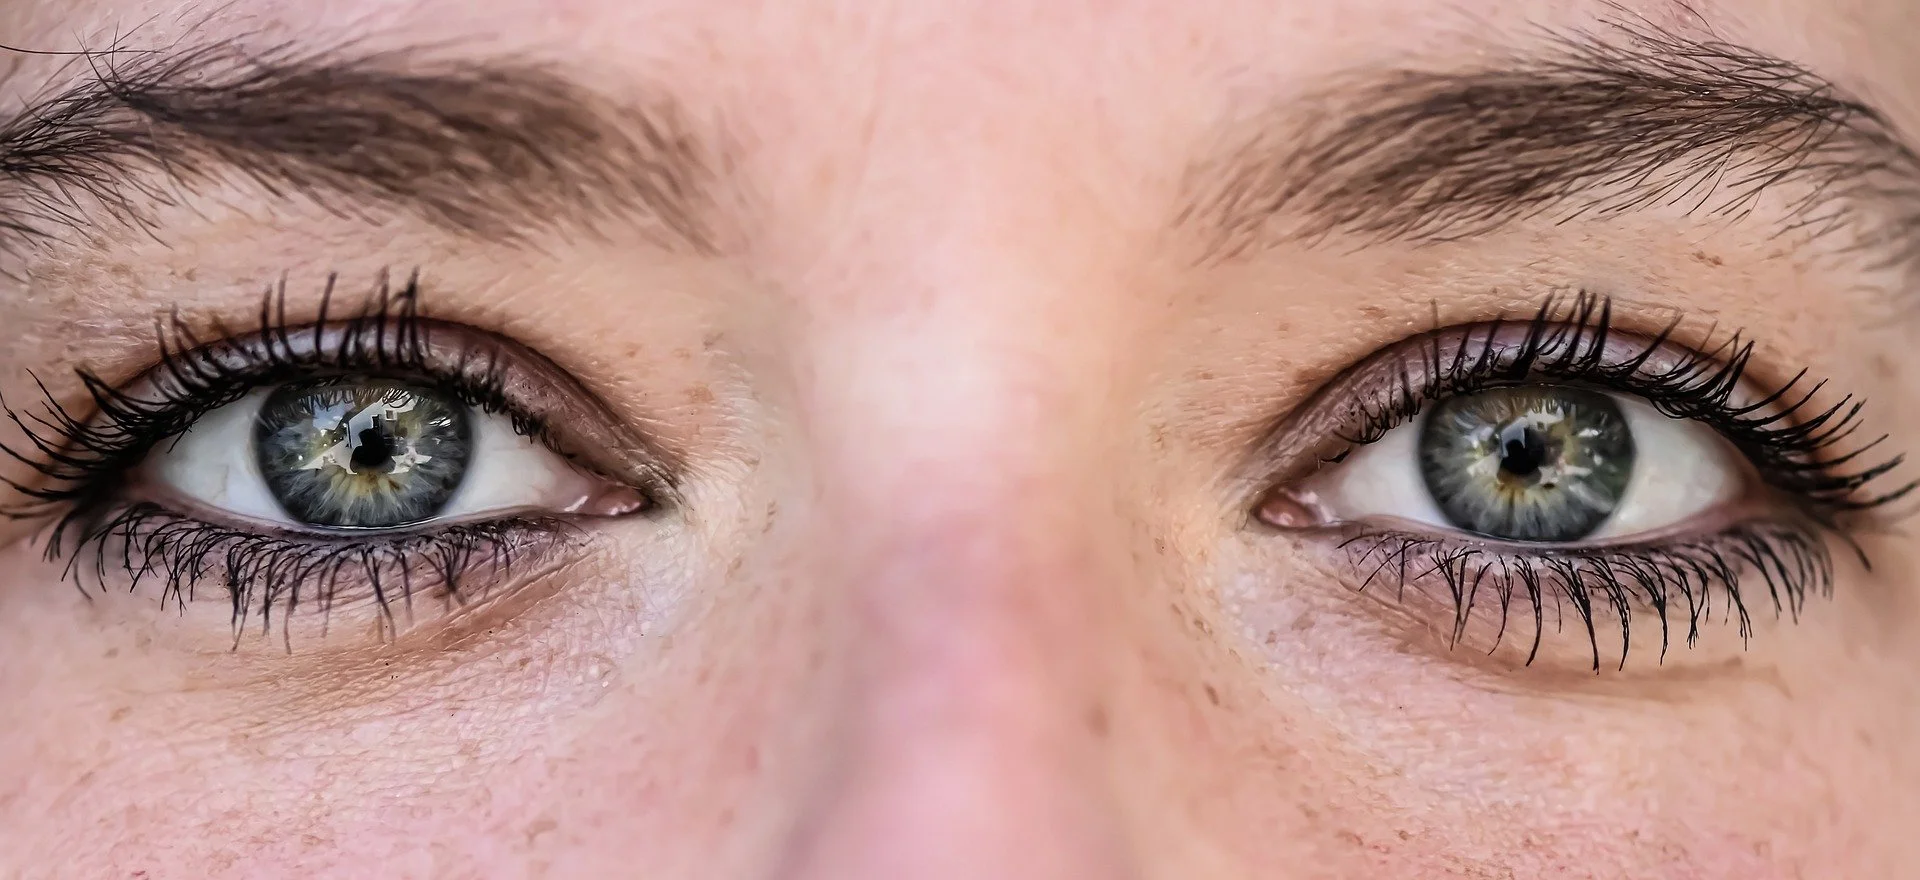
When Things Go Bark in the Night: A Case Study in Home Defense Preparedness
Not many of us get to find out what we would do in a self-defense scenario without there really being a danger. My friend did and asked me to review what she did and offer suggestions how to improve. This is my assessment of then things go Bark in the night.

When Things Go Bark in the Night: A Case Study in Home Defense Preparedness
Recently, a friend of mine—let’s call her Jill—shared a startling experience and asked me to evaluate how she handled it. With her permission, I’m recounting the event here, along with the lessons we drew from it.
🌙 The Incident
Jill was jolted awake at 5 a.m. by her two dogs barking more intensely than ever before. Disoriented and still groggy, she stumbled out of her bedroom to investigate. As she moved toward the front of the house, she noticed blinding lights pouring through the windows. At first, she assumed it was a car outside.
But when she looked out the kitchen window, she saw men dressed in black moving through the bushes with flashlights. Alarmed but unsure, she didn’t immediately recognize them as law enforcement. It turns out they were police officers—sent to her home by mistake due to a mix-up with a veteran’s crisis line. They had rung the doorbell, but Jill hadn’t heard it over the dogs or from her bedroom. Later, she reviewed her Ring doorbell footage and confirmed their identity.
Jill lives alone. Though she owns a firearm, she left her bedroom unarmed, relying on her dogs for security. She wasn’t frightened, but she wanted feedback on how she could better prepare for future incidents.
🧠 My Evaluation & Advice
Jill’s experience was a wake-up call—literally and figuratively. Here’s what we discussed:
1. Know Yourself
If you’re a deep sleeper who wakes up disoriented, having a firearm immediately accessible may not be the safest option. In high-stress moments, confusion can lead to tragic mistakes. Consider less-lethal alternatives like home defense pepper spray.
2. Don’t Leave Your Safe Zone
If your bedroom is your “Alamo room”—a secure space where you can make a last stand if needed - don’t leave it. Investigating noises or lights could expose you to danger. Had there been intruders, Jill would have walked straight into them.
If you decide you need to investigate, go armed with some defensive capability and only go enough to see that something is wrong and immediately return to the saferoom. The police will still come if you can’t identify exactly what is wrong (i.e., there is someone inside or outside).
3. Dogs Are Early Warning Devices, Not Shields
Jill felt safe because her dogs were barking fiercely. But they weren’t trained guard dogs. While they may deter intruders or alert you, they shouldn’t be your only line of defense. If attackers are determined, dogs can be neutralized. Think of them as your alarm system—not your armor.
4. Call 911, Not the Non-Emergency Line
Moments after the fact, Jill contacted the non-emergency line to find out why the police had been at her door. Jill waited two days for a response even with follow up calls. In a moment of uncertainty, dialing 911 is critical. It connects you directly to dispatchers who can relay information to officers on the scene and clarify the situation. Whether it’s a criminal in the area, a mistaken address, or something more sinister like a swatting attempt, you need answers fast.
🛡️ What Jill Could Have Done Differently
Here’s the plan I recommend for future situations:
Secure the Bedroom: Bring the dogs in if possible. If not, close and lock the door to create a barrier.
Call 911 Immediately: Report suspicious activity and request assistance.
Arm Yourself Safely: Choose a defensive tool appropriate for your alertness level.
Take a Defensive Position: Stay out of direct sight lines and prepare to respond if necessary.
Use Your Tech: Check Ring or Blink cameras to gather intel while remaining safe.
🗺️ Make a Plan —Before You Need It
Jill’s experience was a valuable learning opportunity. Too often, we talk about what could have happened without taking steps to improve. Here’s how to start planning:
Map Your Home: Identify your Alamo room.
Choose Your Position: Where will you stand/crouch to stay concealed and protected?
Place Your Tools: Know where your defensive items are stored.
Keep Your Phone Handy: It’s your lifeline to help.
Install Smart Tech: Cameras and lights you can control from your safe zone are game-changers.
Play What If: Run through scenarios on what you and your family would do if…
And don’t stop there—think through daytime scenarios too. What if you’re in the kitchen when someone kicks in the door? How quickly can you reach your safe zone?
🔚 Final Thoughts
Jill wasn’t harmed, but her story is a powerful reminder: Preparation is everything. Whether you live alone or with family, take time to think through your response plan. Practice mentally. Adjust as needed. Because when things go bark in the night, you want to be ready.

Creating a Fire Kit
A fire making kit is essential to survival and important part of any bug out bag. I have tried a bunch of different systems and the following is what I have come up with for simplicity, weight and space savings, and redundancy. Explore what is in your Go-Bag and see if it “matches”.

One of the more important things to survival is fire. A fire can do many things: keep warm, dry wet clothes, cook food, boil water to help purify it, keep animals away and provide light at night for a sense of calm. When developing your bug out bag there are things that you should have to start a fire. Also get training, or read some books/watch you tube and then PRACTICE. Do you have a fire pit? If so use these tools and the skills you learned to start your fires!
There are a bunch of ways to start fires. I have simplified my fire kit in my bug out bag to a couple items. In general you need a source of spark or flame and fuel. To achieve this lets break it down into categories:
Flame: This is any way to create a flame or a spark. The easiest ways to do this are:
Lighter - A simple Bic lighter is an inexpensive way to get a flame. It can run out of fuel and doesn't work too well if wet. You can get a protective enclosure which I recommend.
Waterproof matches - You need to have a back up if your lighter doesn’t work. Have some matches. You will need to have a way to strike these. They also should be in a protective case. These of course are limited in number.
Flint & Steel - A fire flint and the back of s knife typically works just fine. This you can used hundreds of times. There are different qualities out there so be sure to pick a good brand and look at the reviews.
Fuel: Normally mother nature does not always provide dry small tinder for a spark to start a fire easily, so need to have a source of material that easily catches fire so that you can ignite the slightly wet wood or larger wood fuel. Some sources you might consider
Vaseline soaked cotton balls or makeup removal pads. These work GREAT. Melt the Vaseline and dip the cotton into it. To light just pull apart a little bit and get a spark on it. These are my favorite.
Fat wood - this is good if you have a flame (lighter or candle). These are pine sticks that are loaded with natural pine sap which turns out burns very well.
Candle - If you have a flame to light it, the candle will last longer for lighting fuel on fire.
Wax rope - This is better for sparks or flame.
Here are some examples of the products:
Flame/Sparks
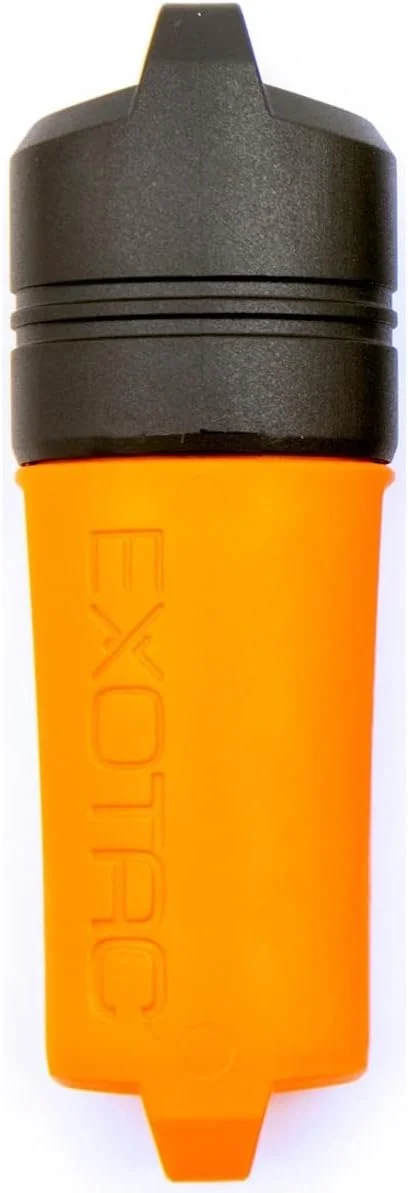
Lighter Enclosure: Exotac fire SLEEVE Waterproof Floating Lighter Case Amazon Link
Why I like it: This is for a regular Bic Lighter. It is water proof, floats, and has clips for tying it off to your bag so you don't lose it. It also has a band that you put on the button to keep it lit.

Waterproof Matches: UCO Stormproof Match Kit with Waterproof Case Amazon Link
Why I like it: This brand has a high reliability even when wet. The case is waterproof as well and has built in striker to make it easy to light the matches.

Flint and Steel : Survival Flint Fire Starter Kit, Thick Ferro Rod (4" x ⌀ 2/5") with Comfy Steel Striker Amazon Link
Why I like it: You really want a little larger ferro rod. Some are very short and that means you don't get a lot of sparks per strike. 6" ones are too big and add weight. The 4" seems to be decent. Also recommend at least some thickness. The striker that is attached is nice but you can always use a knife. The chord is a little bulky for me so I might change it out with a thinner chord.
FUEL

Fat Wood: tBesme Fatwood Fire Starter Sticks Amazon Link
Why I like it: This is great method to get a sustained fire to get other tinder or smaller twigs ignited.

Vaseline soaked cotton balls. Melt the Vaseline and dunk the cotton balls into it. Let them cool and put in a zip lock or container. Tear apart a little and it will light easily with a spark or a lighter. This is by far my favorite and works best for me. There are others that use makeup remover pads, but I don’t think they work as well as the cotton balls.

Emergency Communications Kit
An emergency communications kit may be just the thing you need for your Go-Bag. During a crisis there is no guarantee that cell phones will still work. How will your family communicate? Consider a communications bag for each member of your family. Ham Radio or other walkie talkie like devices will work even if cell phones/wifi are down. Start reading here…
Building your Radio Kit

If something happens, a natural disaster or terrorist attack, and we lose cell towers, how will you communicate to your family? You may want to consider developing a communications kit for each person in your family. What I am presenting here is for local area communication (2-3 miles) and not for long distance.
Before going further, I want to share that I have a Ham Radio license which allows me to use small handheld radios that are much more capable than a Family Radio Service (FRS) or a General Mobile Radio Service (GMRS). The FRS are set up to be radio to radio, you cannot change frequencies. GMRS will give you some variations of what channels you can listen to and typically perform a little better than the FRS systems. Ham radios, depending on your license, can have a significant number of options and are more challenging to setup, but can allow you to get weather, monitor some community emergency frequencies etc. They Ham Radios typically have a bunch of options so you can make it fit your needs very well.
Below is the kit that I have put together. Again I use a Ham radio, but you could do the same for a FRS or GMRS radio. Be aware that many of the accessories may not be available for a FRS or GMRS system. I have provided links but I do not make any money off them. These are my recommendations.


Why I like it: The cost of this radio is less than $70 at the time of this writing. I am not going to be upset if it gets stolen or destroyed. It is very popular so there are a ton of accessories, videos on how to set it up and more.
Extra Battery: B-Tech BL-5L 3800 mAh Amazon Link

Why I like it: It gives me a more time. It is also comes with a USB charger so it can plug into my other power sources.
Be mindful: If you get a case for the radio, it will typically fit either a regular or an extended battery. So you may want the same battery size.
Separate Speaker/Mic: Commountain Heavy Speaker Mic Amazon Link

Why I like it: This allows me to have the radio in a case or attacked to the outside of a pack but I can put the speaker/mic closer to me ear allowing me to better hear it or communicate quicker. Be sure to get a quality set. The first one I got had a terrible speaker, this one seems much better.
Storage Case: Maxpedition Fatty Pocket Organizer Amazon Link

Why I like it: This gives me room for all the things that I want to include in this kit. It is well built and a great value.
Be mindful: You may want more or less items in your kit, so be sure you account for that when sizing your case.
Antenna: Iron Spear Outiitters – Maximus Link

Why I like it: This aftermarket antenna works much better. The antenna is flexible but won’t break. They claim it is unbreakable.
Be mindful: Be sure to order the correct fitting for your specific radio.
Other things that I have in my kit:
Write in the rain note pad and pen. This includes frequencies that I will be communicating on, call sign etc.
MIRKIT – This is an adapter that I can plug into a laptop and using an application can program my radio with a ton of presets and more.
Additional items worth consideration:
Car charger. Be sure that it includes a battery eliminator so that you don’t get interference. This would stay in the car rather than be carried in the kit.
Carrying case. I use the Raptor PMR BAOFENG UV-5R EXTENDED. You can see them here.
I would urge you to consider a Ham Radio license. I will do another article on that topic, but there are incredible resources to help you study for free. There are a bunch of clubs throughout the US that will be more than willing to help you get comfortable using one. Just remember that everyone that has a Ham Radio must have a license to transmit. You do not have to have one to listen, but you cannot talk until you get licensed. It is very inexpensive and not too much effort.
Hope this helps you to be more prepared.

Pepper Spray as a Defense Tool
Pepper spray is a great less than lethal force tool. There are somethings that you should know. This short article breaks things down and provides some recommendations about products you might like.
There are many reasons why you might want to use a less than lethal method of defense. Not all encounters justify deadly force response; you may have moral issues carrying a firearm or you may not be able to carry a firearm where you are going. Whatever the reason, you want to look at certain aspects of Pepper Spray to see which is best for you.
Remember that just because you use less than lethal protection devices does not mean you still cannot be charged or sued for assault. It is best to make sure you know the laws in your state and determine where you can and cannot carry it. Consider a self-protection insurance.
Reputation. Sabre Red is a brand that is used by most police. By using a brand that is used by police it helps to ensure that you do not get something that is too powerful and therefore you get caught up in a lawsuit. It also helps to ensure that it works. Police typically don’t use things that don’t work.
Application type. There are generally 3 types of applications they are below:
a. Fog – I do not recommend this type. A fog type creates a big cloud. It is too easy to get blown around and back to you.
b. Stream – This is watery consistency produces a stream of the Pepper spray that you can aim.
c. Gel – This is also a stream of Pepper Spray but it is a gel consistency that sticks to the attacker. You typically get a little better range from gel than stream.
Dyes. Most Pepper Sprays have a pigment dye and a Ultra Violet Dye in them to help identify the attacker. I recommend this feature be included in Pepper Spray.
Grip. If you are getting the Pepper Spray in a hurry, you want to be able to align it quickly in your hand to activate as well ensure that you don’t spray yourself. You will find several systems with finger grooves on them to make sure this happens quickly.
Inert Copy. If at all possible you want an inert practice copy of what you actually would use. This allows you to practice and get a better sense of how far it shoots, how you operate it etc. Be sure the inert version is the same style of activation.
Below are my recommendations for Pepper Spray Products – I do not get any money from these. I have provided a link to amazon for easy reference but please buy where you like.
For Home Defense:

Product: Sabre Red Home Defense
Why: Large volume, Gel so it won’t go everywhere, easy to use, comes with its own wall mounting hanger.
For jogging or walking:

Product: Sabre Red Runner Pepper Gel
Why: Keeps the pepper spray available in the correct orientation to activate it. Gel gives good distance even in wind. They also have a variant with an LED adjustable strap.
For Purse or Pocket:

Product: Sabre Pepper Gel Kit with Blue Practice Spray
Why: The finger groves help to align the system fast in your hands so that you can activate it. Comes with a practice system to help you understand how to use it and how far it will go. Has a key chain option.

Realtor Safety Suggestions
Being a realtor can be a scary job. Being alone in a house with a stranger(s) in a remote location is not a choice many of us would choose if we could help it. Realtors don’t have that option all the time. Here are just a few suggestions to help realtors stay safe.
A Realtor has a job which is very difficult from a security perspective. Imagine inviting a stranger(s) to an unfamiliar house potentially in a remote area when it is just yourself. Few of us would be comfortable with this in any way, yet realtors do it all the time. Predators recognize this and have targeted realtors for attack. Here are just a few things that a Relator may want to consider to remain safe.
Entering a room or closed space. It is always a good idea to be the last one in and the first one out when entering a room or closed space. The idea here is to never allow the customer between you and an exit.
Familiarize yourself with the house. If possible, it is always wise to become familiar with the house you are showing beforehand. If you are attacked, it would be preferred to understand how to get out of the house as quickly as possible. Knowing where exits are and where they lead can save precious seconds.
Parking of your Car. Always park your vehicle in a location so that you cannot be blocked in. For example, do not park in a driveway if someone can park behind you and prevent you from leaving.
Carry your purse. There may be a desire, especially during an open house of setting your purse down or putting it somewhere safe. There are several concerns that you should attempt to mitigate with this. Those concerns are:
a) Keys – Typically your car keys are in your purse. If you must escape, you won’t have keys to your car. (Consider a car with a keypad lock so you can get in without a key at least). They also include your keys to your house and your wallet has a driver’s license with your address on it. This gives them the keys to your castle.
b) Personal protection device – Typically realtors, especially women, wear a little more form flattering clothes and do not carry a protection device (gun, pepper spray, etc) on their body. They will leave it in their purse. The purse should never leave your control, especially with a firearm in it, but even with other self-defense tools, leaving them in a purse in another room doesn’t help you if you are attacked.
c) Phone – Women especially do not carry cell phones on their hips like some guys and many of their clothes don’t have pockets in them. If it is left in a purse, then you can’t call for help, and it won’t do well for tracking you if you are kidnapped. You should always have a trusted person tack your phone.
Tactical Pens – Something you can always carry with you which will never look out of place is a self-defense pen. They make very simple, classical looking pens that are strong enough to be used for self-defense. It is something that you can always carry and not look out of place and is practical as well. Watch Jason Born when he takes out the bad guy with a Bic pen.
Pepper Spray – While it may not be easy to carry pepper spray on your body it might be on a key chain and not raise fear in your sutlers. Pepper spray is a great tool. I recommend sticking with either Saber Red or POM (Piece Of Mind). You want a pepper spray that also has an ultraviolet dye in it. This won’t wash off right away and will give police the ability to make connections if they find the suspect. Consider a gel to get farther distance and in slightly windy conditions. Take a class on how to use this and buy either an inert version or a spare to see how it really works. Learn ahead of time how the mechanics of the trigger works but also how far it shoots etc. Be sure to take proper precautions if using the real thing.
Come learn more about these suggestions and more at a Sampson Consulting Relator Safety Class. Contact us for a class today!

Picking a Hand Gun For Someone Else
Don’t select a gun for someone else! Let the individual pick their own gun. A great way to help them gain the knowledge and experience is to have them take a Gun Selection Class from Sampson Consulting.
I was recently asked about giving a gun as a gift. While I certainly support providing firearms to responsible law-abiding citizens, I don’t recommend that you purchase a gun for someone unless they have indicated what gun they want. Why is that????
Buying a gun is a very personal thing. It is also expensive. I strongly recommend that someone try the gun (or a bunch) before purchasing. It is very different experience between just handling the gun at a counter in a gun store and shooting it. Please believe me when I tell you, you should shoot the model of gun you are interested in purchasing.
Hand shape – Someone may have broken a finger, and it didn’t heal right causing some guns not to work well with a particular gun.
Hand size – If the hand is small for the gun, they will have to rotate the hand to get the finger to reach the trigger. This causes the backstrap to shift from the center of the palm making the gun twist in the hand. If the hand is not rotated, then the finger won’t be positioned on the trigger properly. Both will impact accuracy. If the hand is too big the shooter will tend to put too much finger on the trigger. Then you have the issues of reaching the controls as well.
Recoil - Being sure to select a caliber and gun size that produce a manageable recoil. A lighter gun will have a higher perceived recoil compared to a heavier gun of the same caliber. A larger grip makes recoil easier to manage.
Hand Dominance – Not all guns are set up for left and right handed shooters, but some are or could be modified to suit either.
Strength – Hand and arm strength are another thing that will help determine what gun is preferred. On many smaller compact guns, the recoil spring feels stronger because it must be stronger to absorb the recoil because the slide is lighter. There are several gun models that have reduced recoil springs or features to make it easier to rack (S&W EZ). H&K has tabs on the rear of the slide that facilitate the grip of the slide, so you don’t have to have as much grip strength to rack it the gun.
Well intentioned sales people or shooters all have opinions based on their “personal” experience. Those opinions are not based on your personal experience. It’s OK to listen to their suggestions, but in the end the gun has to work for you not someone else.
Hopefully if this has explained why the person needs to be heavily involved in picking out their own gun (unless they have a lot of money or want to buy a lot guns☺). Visit Sampson Consulting and take a Gun Selection Class where you will learn how to fit the gun, pros and cons, features and be exposed to over 20+ different firearms in different calibers.
Hope to see you in class!

Winter Driving Kit
What should you have in a winter driving kit? This article explains what types of things you may want to put in your vehicle for traveling during the winter. Are you prepared? Check this article out to see.
In South East VA, we are fortunate that we don’t get a lot of snow. Municipalities however don’t invest a lot of money in snowplows etc and as such when we do get it, it’s only the main roads that get treatment. This means that if you must go (which I recommend you don’t if you can help it), you should consider a winter “kit” for your car.
Having grown up in central New York, in a very rural area in the Finger Lakes, we always had emergency kit in the vehicle. In case we went off the road, it might be a couple days before anyone found us or we might have to walk out. If you remember the winter Storm a couple years ago that basically shut down 95 for a day with people stuck on it – it can happen here.
The following is a general list of winter supplies that I keep in my vehicle:
Blankets – I keep several blankets in my truck. They can be used if the truck breaks down and I lose heat to help keep warm. They can also be used if you find someone that has been outside and freezing, and they can be used to put on the ground to isolate you and keep you dry if you must change a tire. I typically keep at least one blanket for each potential passenger.
Water – I keep a couple bottles or small jugs of water in my truck all year long. They are BPA free and plastic. If they freeze, I don’t want them cracking the plastic, so they are not filled to the top. Water is always important no matter the time of year and can be used for drinking, washing hands/wounds as well as eating if you have some dehydrated food and a fire.
Food/Snacks – I have a baggie that I carry a couple Payday and Kind Bars. I don’t do chocolate as I don’t want them to melt. It is enough to give me some energy if needed and keep people from getting “Hangry”.
Fire Starter – I carry multiple means to start a fire: waterproof matches, lighter, flint & knife as well as some Vaseline-soaked cotton balls. Fire can be used for keeping warm, cooking food, heating water, and signaling if needed.
Winter Jackets & accessories – I carry a couple different winter jackets in my truck because many times due to the mild winters I may be going out with a light jacket because the truck has a heater, I don’t want to sweat to death. This means if I break down, I won’t have clothing appropriate for being outside in the weather. I also have gloves, scarf and a winter hat.
Ice Scraper – Having an ice scraper with a brush attachment allows you to clean off your windows. Many people don’t have the patience to allow the defroster to de-ice the windshield and they don’t work on the side windows. Be sure all the windows are cleaned off before driving. If you have a bunch of snow on top of your vehicle, I recommend that you be kind to other drivers and brush that off as it becomes a white out condition for cars behind you if you don’t.
Flashlight – Problems for some reason never occur in the bright day light so always carry a flashlight in the vehicle and make sure the batteries are good. This is an ideal situation for the flashlights that use the 123 batteries as they have an incredible shelf life, and they are not affected by cold temperatures.
Handwarmers – It is a nice to have, but I carry the chemical hand warmers that you shake up to activate. These work if you lost heat or it just a cold day and you are out on the range.
Folding Shovel – I carry a military style folding shovel, so it is nice and small. I can use it if I get stuck in an area to break up ice to allow tires to get traction, remove snow mounds etc that are stopping the truck. It also can be used as a self-defense tool.
Tow strap – A tow strap can be used to get me out of a jam or someone else. Be sure that you know how to use one, so you don’t damage your or someone else’s car.
Flares – Road flares are great for a bunch of uses. Warning other drivers of an accident ahead, especially if it is on a hill or blind curve. It can also be used as a fire starter if worse comes to worse. You might also consider “electric” road flares, they won’t start a fire, but they probably will last longer.
Cell Phone Charger – You must be able to ask for help and a dead cell phone won’t allow you to do that, so carry a portable charger. They are super cheap but oh so handy. Keep in mind that car batteries don’t like cold – just ask Tesla owners so you car battery maybe dead so don’t rely on it.
Jumper Cables – Car batteries that die in the winter normally aren’t super bad, but the cold just pushes them over the edge so they normally can be brought back to life with a jump. Know how to use jumper cables or at least keep the instruction tag on them. Or better yet you can get these portable battery jumping systems, so you don’t have to have a second car. Just be sure the amperage of the jumping system is sufficient for your vehicle. If you have a truck the Cold Cranking amps of the battery is pretty large.
There other items that you can carry to help manage risk in an emergency, but these are what I use. I also always have a “bug out” or “get home” bag in the vehicle with even more stuff, but that is another article. Stay warm and safe.
Hope to see you in class!

How Could A Class Change my Life?
Afraid of guns? Is someone threatening you? A safety/security class or a firearms class maybe the thing that helps you overcome a feeling of helplessness.
How could my life change by taking a safety or firearms class? Sounds dramatic right? It is however a valid question to help you understand the many wonderful and powerful possible outcomes. The level of impact is largely a function of your experiences prior to taking a safety or firearms class.
Many of my students have had some exposure to firearms or lead a reasonably safe life and they walk away from the class with a better understanding of safety and how to shoot. Maybe it ignites a lifelong passion, and they go on taking more classes or become an instructor to pass their passion on. Others have a very different experience going into the class.
I have had several students that were in fear for their lives. Some had restraining orders trying to keep someone away from them. Some had been physically attacked and put in the hospital and now were afraid to leave their home or apartment. In situations like this, a safety class like Less Than Lethal or Refuse To Be a Victim or even a concealed carry immersion class empowers them, and they no longer feel helpless. Seeing personalities change when they no longer live in fear is an incredible transition and one that gives me a fulfillment as an instructor like no other.
I have seen some students who have had traumatic experiences with a firearm become firearm instructors and I have some that have just broken down and cried in joy because they overcame one of their largest fears. These experiences as an instructor are what invigorate me to want to help more people.
I don’t know many instructors that started out understanding that their profession could have that kind of impact but the ones that come to that realization are truly blessed in my opinion. For me knowing that I can change someone’s life, makes me want to be a better instructor. It makes me want to be the best I possibly can be, to hone my skills not only with safety and shooting but with communication, empathy and understanding.
I hope you don’t have any traumatic experiences or people that are after you, but if you do, know that there is someone who cares and wants to help.
Hope to see you in class!

Mantis Releases AR-10 Version of Blackbeard X!
Mantis-X releases new AR-10 variant of its popular Blackbeard-X Series. This integrates the Mantis-X capability with an auto trigger resetting capability to allow countless hours of dry fire practice.
Mantis has officially released an AR-10 version of their very popular Blackbeard X Product. Mantis has packed all the same great quality features we have come to love in the Blackbeard and Mantis-X into a system for your favorite AR-10 to allow us to perform advanced dryfire practice.
Mantis has developed a system that replaces the bolt carrier group and magazine to allow you to dryfire your AR. The system automatically resets your trigger to allow for the next follow up shot. This combined with the connection to the Mantis-X App provides for an incredible set of analysis tools takes your dryfire practice to a whole other level.
The system as it arrives to you comes in a very nice case that contains the magazine, the bolt carrier, charging cord, and laser alignment Allen wrench. It also has a sticker and instructions.
The system is easy to use. First thing to do is to charge the magazine. Unlike the older Mantis-X systems, this uses the newer USB-C charging interface. A full charge is expected to be good for 50,000 shots! The only thing that requires charging is the magazine. The Bolt carrier replacement gets it power from the magazine.
After charging place, remove the bolt carrier group from your AR-10, press the hammer in to the lock position and insert the Mantis X bolt carrier into position and re-assemble the rifle. At that point the magazine is inserted and you will need to power up the system with a button on the magazine. This will also allow you to sync with your Mantis App.
It should be noted that the buttons are flush and don’t stick out. This is a nice feature to ensure that the nothing hits them accidently as you are handling the rifle.
The bolt carrier group has a button on it to toggle the laser to off/trigger/on. The trigger setting allows the laser to come on only when the trigger is pulled. The carrier group also has laser alignment screws that are easily accessible while in the gun through the ejection port.
When you sync the magazine with the App, it automatically recognizes which system it is synced to and provides drills and settings that are available to the Blackbeard X system. You will see some of your standard drills like benchmark, compressed break etc, but you also will get Kneeling and more that are specific to the rifle.
What I really enjoy is the Courses. Mantis has 3 levels of courses, Basic, Advanced and Elite courses that will test your ability as a rifleman. While the drills are essentially the same, the required performance increases. Completing these courses will provide a marked improvement on the range. Mantis will also send you a very cool Velcro patch for free when you complete each level.
The system is sold for $299 with no laser, $319 with a red laser and $349 with a green or infrared laser. They have specific versions for AR-15, SIG MCX, AR-10, FN-SCAR Light, and FN-SCAR-Heavy (Both FN variants are going to be released soon in 1 quarter of 2025).
To find out more or purchase your own Blackbeard X, visit them today at:
https://mantisx.com/pages/blackbeardx

Is 3 hours enough to save your life?
Is a 3 hours Concealed Carry Class enough to save your life? I do not believe so. Explore the amount of information and topics that should be included with a CCW class. If the 3 hour wonder class doesn't cover the included topics, then you probably need more training.

In Virginia you are only required to have gun safety training to obtain your CCW permit. A hunter safety class and a DD-214 all qualify for a CCW permit. How many hunter safety classes or veterans are taught how to draw from concealment, the legal, ethical, moral implications about use of force or what to say on the 911 call or to police when they show up? I never got that when I took my hunter safety class or served in the Navy. The bar is very low to meet the CCW permit training requirement and organizations are making money off that.
If you want a concealed carry license you can find that most commercial ranges and training centers offer a 3 hour class anywhere from $90 to $180. Do you really think that 3 hours will be enough to save your life (or your loved ones) and keep you out of jail? In my opinion the answer is emphatic NO.
While these classes may have some good content, there is no way to cover everything you need to know. It is just not enough time. While we live in a world where instant gratification is king, I offer to you that when it comes to preserving your way of life, taking short cuts is not recommended.
So what is a good class length? Like anything it depends on how much experience you may already have. Let’s explore what you might want to include to become self-defense ready.
- Basic Handgun Marksmanship – If you have never had any handgun training, you need to get a good foundation before you decide you want advanced training. Most advanced handgun course will require you to have some level of competence prior to attending. If you don’t have this any advanced training will be almost useless.
- Defensive handgun operations – This is a class where you learn how to draw from concealment, how to do emergency/tactical reloads, how to clear malfunctions, defensive accuracy, and where to shoot. You may want to consider movement and protecting your family (how do you control your family if they are with you) or you how to shoot in a crowded area. Without this these aspects you will not know how to effectively get your gun out and keep it running. You also may not know what to do in a defensive situation or possibly shoot someone you don’t intend to.
- Self Defense Incidents – You need to learn how your body will react in a self-defense situation, the legal aspects of when you can and cannot shoot, how long to shoot, what to say on the 911 call, what to say (or not say) to police), how find a lawyer, what to tell your family if you are involved in a self-defense encounter. In addition, they need to tell you what you should do ahead of time to make it easier, smoother, God forbid something happens. Without this more than likely you will end up in prison.
- Refuse to Be a Victim – The best fight you will ever be in, is one you avoid. This means that when carrying you really do want to avoid the fight. How do you de-escalate, avoid, or escape. Understand where to park, walk, how to avoid being put in bad situations. Without this training you run a higher risk of being involved in an attack.
- Emergency Medical class – just because you are wounded or a family member is wounded doesn’t mean you are done for. Consider classes like stop the bleed, emergency first aid, or American Red Cross First Aid. Without this you may run the risk of dying.
- Simulation – Just because you have the classroom lectures and some range time, does not mean that you will be successful. You need to put it into practice. How many times have you practiced verbal challenges (ie even know what to say), conducted the shoot and then practiced a 911 call or what you say when police show up? Without this training you will not be as ready as you possibly can. It is kind of like practicing batting, catching and throwing a ball but never had played a baseball game – how well do you think you will do?
The Refuse To Be a Victim and Emergency Medical classes are not required to be successful in carrying, they are an additional aspect that you should consider. The others are a minimum that will help give you a good chance for surviving a deadly encounter and staying out of jail.
The above is what I would recommend to someone that I cared about if they wanted to get a Concealed Carry Permit. The above is not a 3 hour wonder class. You might be able to break this up into 3 hours sessions, but someone that takes a 3 hour class in my opinion is woefully unprepared for dealing with a threat on their lives. As always consider what training you take and how it really helps you get what you need to be successful.

Steiner Tor-X Review
Review of the new Steiner TOR-X laser. This new laser has the Mantis Training Device integrated into it. This allows you to easily switch between training and carring without having take the laser on and off and re-zeroing.

Mantis and Steiner have teamed up to provide you the TOR-X! The TOR-X is a combination of a self-defense green laser, Steiner’s Tor Mini, and a MantisX training device. This device allows the user to have an all-in-one device that you don’t have to take on and off when you switch between training and carrying.
Mounting
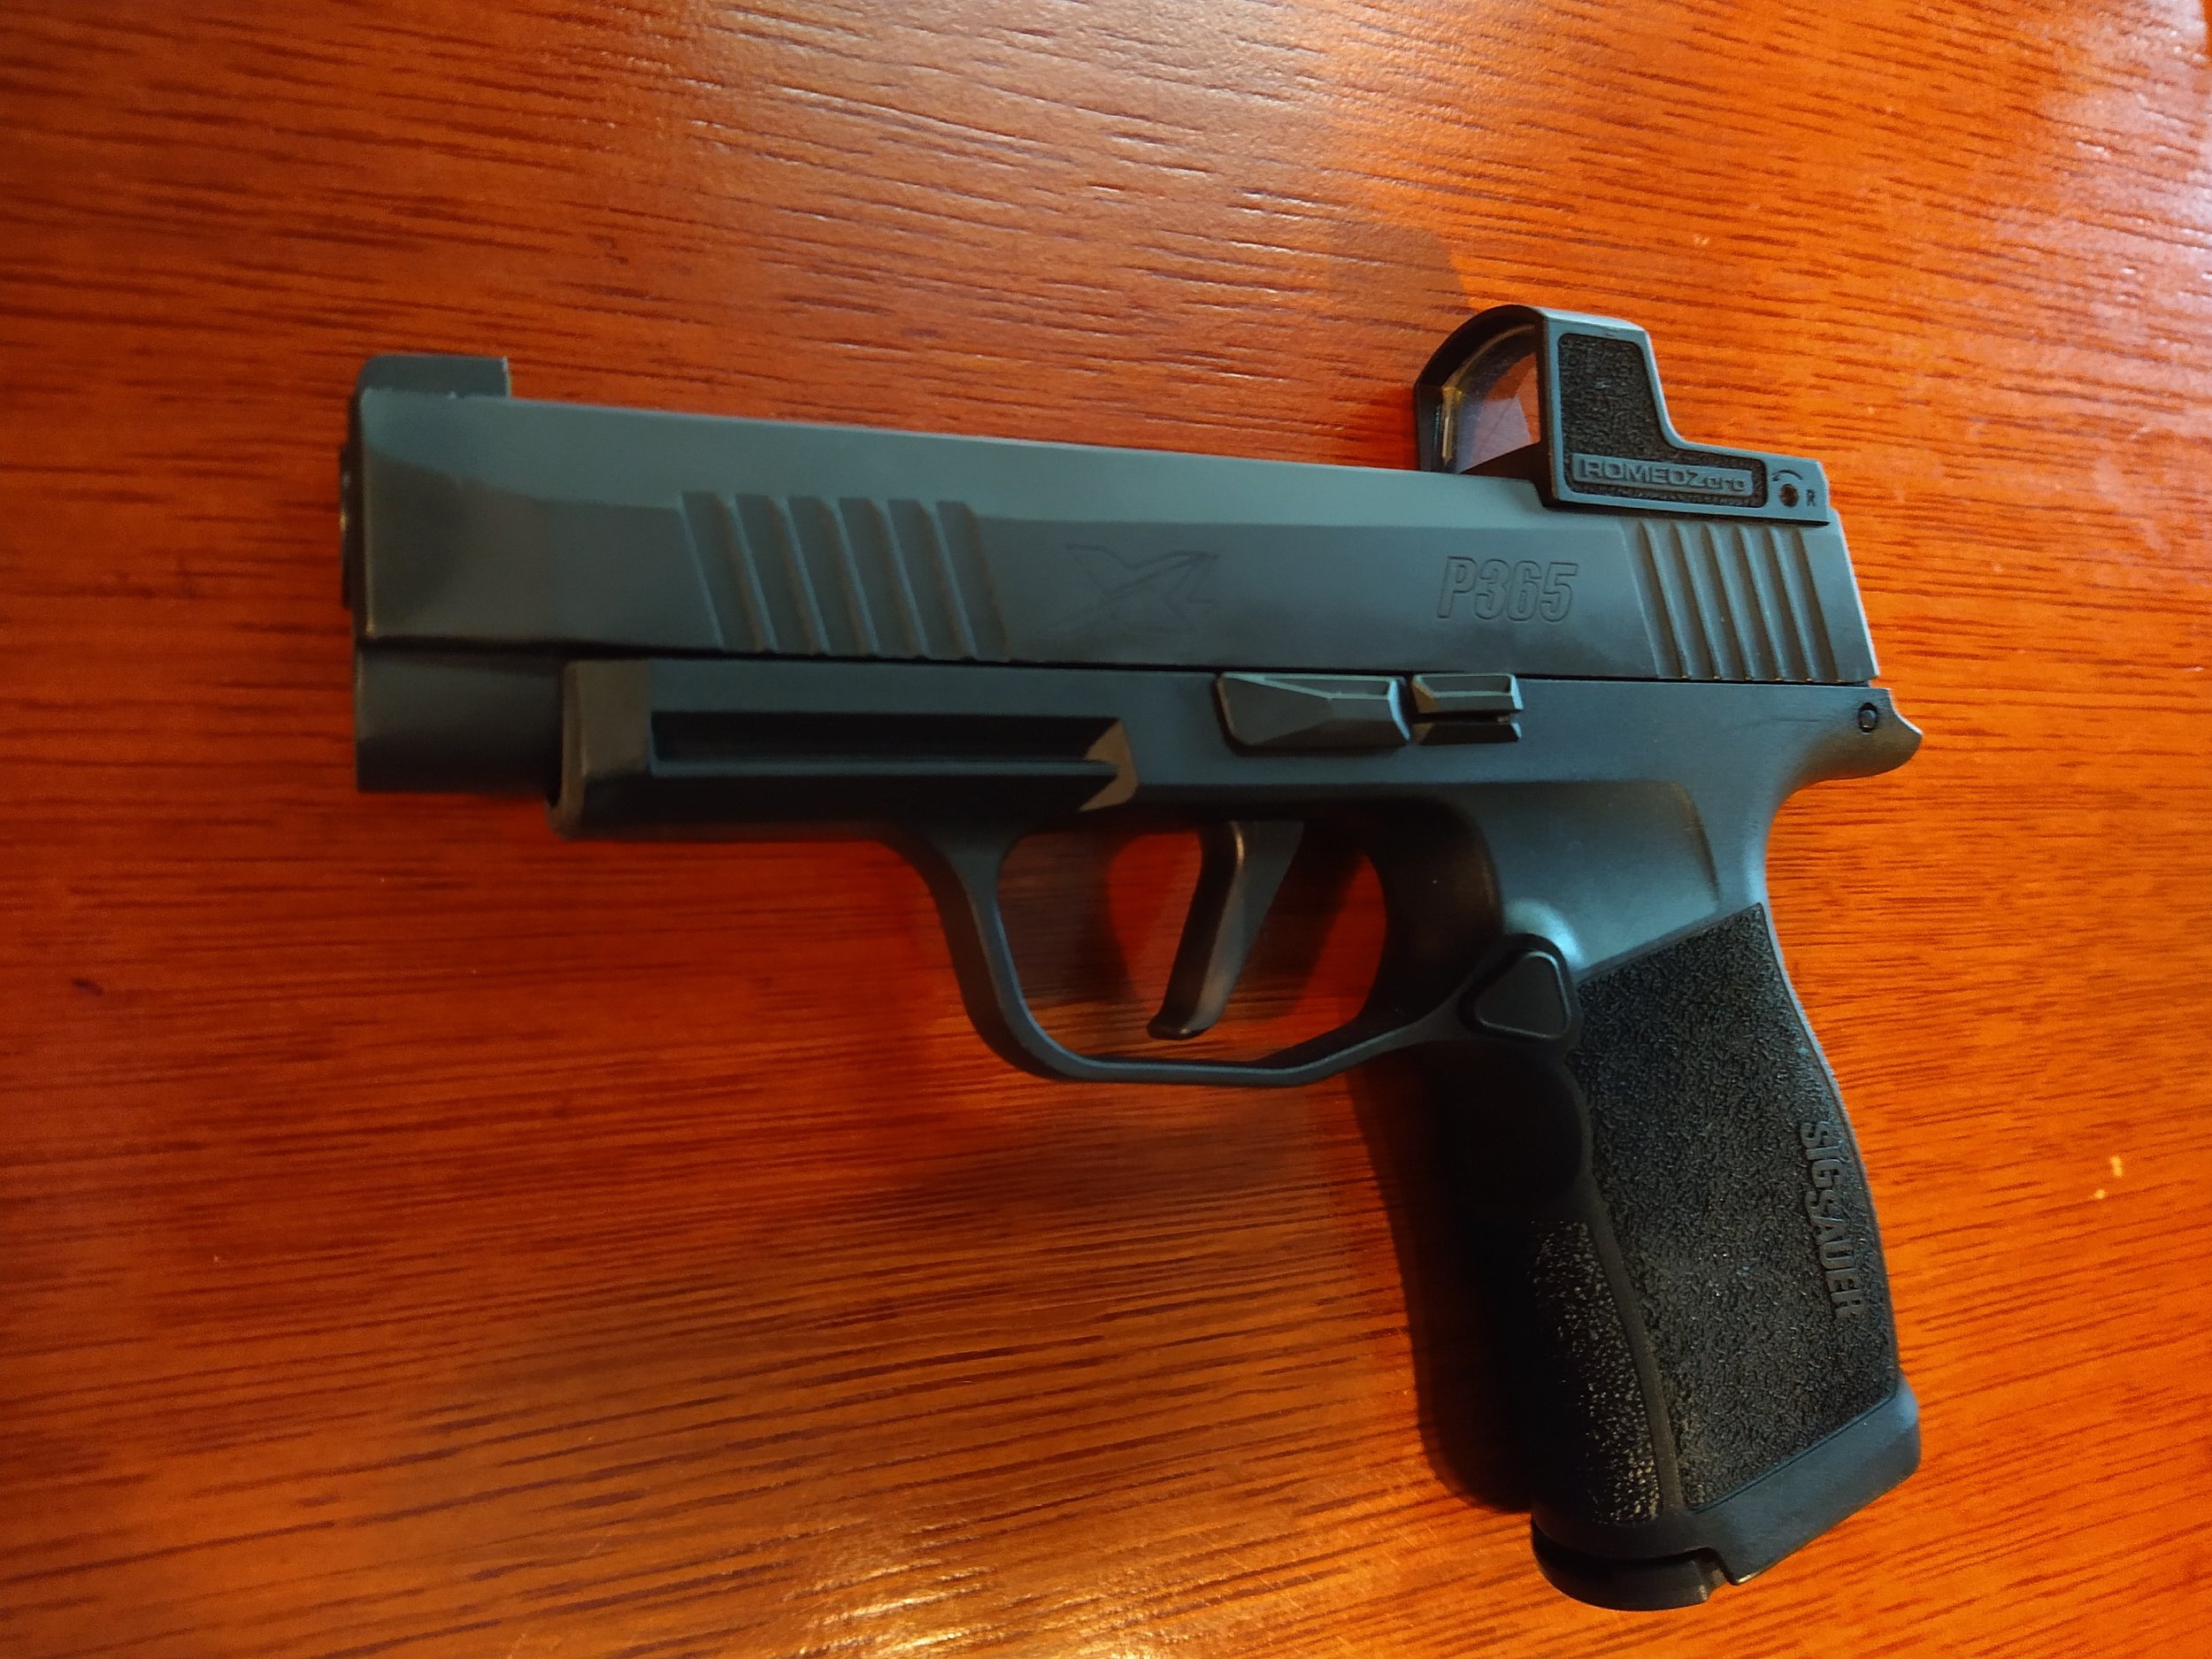
The unit is mounted on your accessory rail under the barrel and activated via your trigger finger. The laser has an adjustable recoil bar to lock in the picatinny rail so that you can position the buttons within easy reach. The recoil bar is easy to reposition so that you can position it exactly where you want it. You want to ensure your trigger finger can activate it without blocking any of the area forward of the trigger inside the trigger guard. The unit uses a provided allen wrench to attach the unit to the rail. The unit locked up on my S&W M&P 2.0 Compact smoothly and tight.

Top view of the Steiner TOR-X shown the adjustable recoil bar that is used to lock in the picatinny rail. This makes it very adjustable to get the exact placement desired.
Battery
The TOR-X uses a CR1/3N battery which you can easily find. They provide a Duracell battery with the unit. The battery compartment is located on the bottom of the unit, so you don’t have to take it off the gun to change the battery which is always nice as you don’t have to re-zero the laser. Note the battery cover has an off-center slot for opening and closing. The slot is wide enough to handle a nickel. Being offset from the center is a little unique when attempting to open the cover but easily managed.
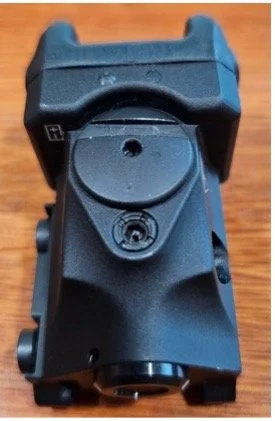
Bottom of the Steiner TOR-X showing the battery compartment with the offset slot.
Size
The length is roughly 2-3/8” long, by 1-1/8” wide by 1-1/4” tall. While a little bigger than the TOR Mini, this will fit with most holsters that are designed to handle a laser/light. When in doubt you can always order a custom holster. The unit with a battery per my scale weighs in at 69 grams. It is a little heavy, but this unit is solidly made with an aluminum housing. It is only 9 grams heavier than the Steiner Tor Mini. The unit will add some weight forward but will help with muzzle rise when shooting.

Steiner TOR-X mounted to S&W M&P 2.0 Compact

End view of the Steiner TOR-X mounted on a S&W M&P 2.0 Compact
Laser
The military grade laser is a green laser with a good intensity. I prefer green because I find it easier to see. Supposedly the human eye sees green better than red due to the rods and cones in our eyes. The on/off buttons are ambidextrous so you can use the laser with either hand. I found the activation of the trigger finger operated buttons some of the best that I have experienced. The angle is very ergonomic and found them very easy to operate. The unit is splash proof.
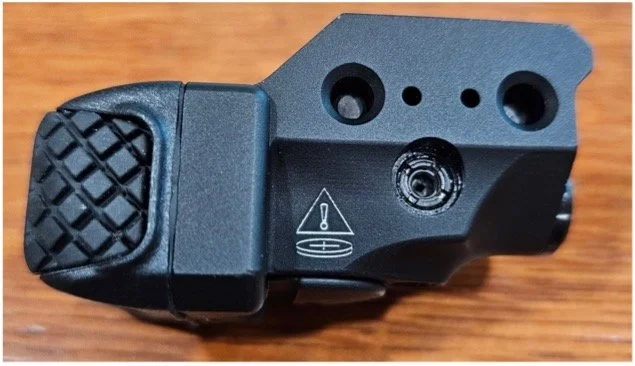
Right Side of the Steiner Tor-X. Note the laser activation buttons. Some the best I have used.
Mantis Training
What sets this apart from other lasers is the MantisX training system integrated into the laser. You connect the TOR-X to your MantisX software (normally on a phone or tablet) using Blue Tooth, by pressing both laser activation buttons at the same time. There will be a little blue light that shows up on the bottom of the laser. When you are done training you press both buttons again so the blue light goes out. Then a press of either button will activate the laser.
The unit performed flawlessly when I synced and used the TOR-X with my MantisX software. Because I have the MantisX 10, I was a little worried about swapping back and forth between the TOR-X and X10 unit, but it links with which ever you are using. There are no settings that you have to change because you are using different units. It is interesting that the colors for the menus change to blue when using the Steiner TOR-X. When using the X10, the menu items are Red.
You still will have to change the normal settings of the gun type, the live/dry/CO2 setting. Also be sure to check the that you have the mount forward and, on the bottom, if it is mounted on the accessory rail under the barrel.
As a hint, be sure to turn off the TOR-X off after training. I didn’t and it killed the battery. The next day I went to activate the laser and it wouldn’t come on. After some trouble shooting I changed the battery and it worked like a charm. Perhaps we need an auto-off feature in the mantis-X training mode.

Steiner TOR-X showing the blue light on the bottom of the unit when it is synced with the Mantis-X software
Multipurpose Items & Warranty
Normally I am not a big fan of multipurpose equipment, especially when it comes to my self-defense equipment as I want to keep it simple. This however comes with the Steiner’s Heritage Warranty as well as Mantis standing behind their products. I have found Mantis to be fantastic customer service with their products.
I did ask who the primary company for warranty repairs would be and the answer is Steiner. Mantis will provide any software trouble shooting. I think both companies have a great track record at supporting their customers.
Why would you consider this multipurpose piece of equipment? It is because you don’t want to have to remove your laser to put the MantisX system on the rail and switch back and check zero every time you want to train. Obviously, this applies to only those that are using rail mounted lasers, but for those that do, this will make training easier to do. When it comes to self-defense the more training you do, the better your chances of a successful outcome.
Overall Impression
The TOR-X has a great build quality which we come to expect from Steiner. You won’t be disappointed with the quality of construction. The integration of the MantisX software into the laser is a unique niche market for Steiner and Mantis, a move designed to improve the opportunity and reduce the effort to train. In a world where the demand on our time is higher than ever, this product is a life saver when it comes to making it fast and convenient to train and that might result in literally saving your life.
MSRP for the TOR-X is $359.
For more information on the new TOR-X pistol-mounted laser and integrated training system, please visit Mantisx.com

Left side of the Steiner TOR-X

Self Defense Simulator Training
Sampson Consulting rounds out classroom lecture by offering a hands on Concealed Carry scenarios or self-defense role playing class. Put what you learned into practice using laser cartridges to make sure you improve your chances of a successful outcome. This is an invaluable training tool. Take Advantage of it today!
Did your concealed carry training have you practice scenarios and incorporate, verbal challenge, getting off the “x”, assessment of drawing too soon, ensuring a smooth draw from concealment or even making your 911 call? If you decided to not be involved, did you know when to leave or what the assailant looked like?
Too many times what is pitched as a CCW class, covers only a couple areas of really what is needed and it is a one way lecture. You have no idea if presented with the scenario if you would do it right or not. Sampson Consulting offers the opportunity to practice all of these and more with a state of the art simulator form Smokless Range.
This is not a live fire class, but you will use your gun and holster with a provided laser cartridge. The interactive video series will present around 15 different scenarios such as:
Car jacking, home invasion, child snatching, business robbery, active shooter, and more.
Class size is best suited to 4-6 people. Contact us today to find out what you have been missing.


US Law Shield Affiliate
Sampson Consulting becomes Affiliate for US Law Shield
Sampson Consulting is proud to announce its affiliation with US Law Shield. We are committed to ensuring that we provide our customers with options that fit their needs. There is no such thing as a one size fits all when it comes to concealed carry insurance. US Law Shield has undergone some major improvements over the recent years and will be a great resource for many of our clients.
If you are looking for Concealed Carry Insurance, please consider US Law Shield as a contender. With custom plans you have the ability to provide just what you need. For more information use the code below:


Mantis Laser Academy Training System
Winter is here and the weather is already getting a little chilly. Many folks reduce their trigger time because of this. Mantis has a new product called the Mantis Laser Academy Training System that can help you out.
Many people are familiar with Mantis-X which is device that is attached to a rail of the gun or a magazine to help grade and assess your shooting skill. The primary focus is measuring how much you move the gun as you press the trigger. It does not involve a target. This is an outstanding product that I have been using for years with myself and students.
The new Laser Academy Training System is another option offered by Mantis. It does not do the assessment but actually uses a laser cartridge and a variety of mantis targets to record your actual performance and how well you score on the target. The system comes with a laser cartridge, tripod for the camera, camera holder, targets, stands carrying cases and more.
You download a free version of software (an application) on your phone that is used to score your shots. It has courses, drills and even a marksmanship test to hone your skills. The provided targets have QR codes on them that the camera automatically identifies and adjusts the scoring rings etc. This allows rapid setup or changing of targets to be able to set up your own course of fire or use one of theirs. You can also create your own targets but takes a little bit of effort. Mantis offers 3 different sizes of targets 5 x 7, 8-1/2 x 11 and 17 x 22.
Mantis also offers and additional level of programming called the “Pro” in the application for an additional fee. At the time this writing, you can purchase a single drill for $4.99 or full access for $49.99 which includes 19 additional drills. This advanced version also allows you to use multiple targets and more.
Mantis will track your progress and show a history of how well you are doing. It also shows how often you practice. With number of shots, longest streak, longest gap and success rate. In the individual drills it will show shot placement, the time and split times for each shot. It will also allow you to record notes about your session. This is a great way to help keep a shooting log and measure your progress and improvement.
This system because it comes with a laser cartridge can be used with your pistol or you can use a SIRT pistol if happen to have one of those. It also has the ability to work with two shooters.
Mantis is currently selling this in a Portable ($99) or Standard ($159) versions. This will make a great gift for yourself or your favorite shooter.
TO find out more or purchase click here - http://www.mantisx.com/

Using Your Self- Defense Ammunition
How often should you shoot your self-defense ammunition?
How often do you shoot your self-defense ammunition? Almost never right – have you seen the price of that stuff (if you can find it)?! I have been guilty of this in the past but have tried turning over a new leaf in my more enlightened years. The question is why you want to shoot your self-defense ammunition on a routine basis. There are many reasons, let’s explore some.
1) Our carry ammo goes through a lot when it comes to environmental conditions. It goes from hot to cold to wet etc. If you recall from any NRA training class ammunition likes to be stored in cool dry locations. If we put ourselves (and hence our ammunition) in conditions that are not cool dry conditions, it runs the risk of having issues. We need to make sure it still works.
2) Legal protection. There are some legal aspects that you need to consider as well. God forbid you are involved in a self-defense shoot and one of your rounds impacts someone else. While you may escape charges in a criminal court, the civil court is a harder thing to win due to the lower bar of requirements. One of things the prosecution may ask is how often do you practice with this ammo? Are you aware that it has a different point of impact than regular ammunition? They are trying to prove “negligence” that you carried this deadly weapon without understanding how it worked and as such the jury should award punitive damages. I recommend you keep a record of each time you shoot your self-defense ammunition (as well as any time your train).
3) Make sure your system works. Ammunition manufactures don’t set up a line and leave it up. Typically, they set it up, run a particular style, then put up the next one and the next etc. This take down, set up over and over can result in minor changes that impact the function of your firearm. In addition, if the vendor changes components or even the design (they are always trying to improve) it might not work in your gun anymore. Also, your gun may get more worn in or something tweaked that all of a sudden, your self-defense ammo isn’t working the same way it did when you tried it 10 years ago. Test the self-defense ammo in your firearm routinely to make sure everything works.
4) Clean things out. Do you have any idea how dirty magazines and such can get carrying? By shooting those stored magazines, you will clean out all the pocket lint etc. You don’t want the lint causing problems when you need it most.
How often is routine? I recommend once ever 6 months or no more than a year. This will be sure to keep things fresh, cleaned and give you a reasonable defense.
See ya on the firing line!

Red Dots
Red Dots
Some of us are older in age and have seen stuff over the years being introduced and thought that is a gimmick to sell things. I am sure that when Red Dots first came along to replace iron sights or scopes there were many that thought this way about this new technology, but time has proven them wrong. Let’s discuss why I think so.
What is a Red Dot
There are several different types of Red Dots, but the ones I am going to talk about are the style you see mounted on the top of the slide back by the rear sight in the picture above. There is a red light that is projected from behind and on to the vertical glass. There are a bunch of styles of “Dots” some are green, some are rings, you can make it brighter or darker. The concept is, you put the “Dot” on the target where you want to shoot it.
Focus On the Target
First let’s explore why you might want to consider Red Dots for a handgun. Many people like to look at the target rather than the front sight. This is especially true in a defensive engagement as we want to look at the person attacking us. The way you use a Red Dot is to focus on the target and let that Red Dot be a blur on the target.
Far Sighted
For those that are far sighted – can’t see up close (ie your front and rear sight), a Red Dot prevents having special prescription shooting glasses. This might be helpful for a home defense situation where you don’t have time to get your readers to see the sights or if they are knocked off in a fight.
Simple to Use
As described above using a Red Dot is simple, you put the dot where you intend to shoot. There isn’t the equal height, equal light and trying to get two objects to line up on the target. People generally find this very quick to engage targets because of this.
Eye Dominance – No problem
You use a Red Dot with both eyes open. Because of the way it works and you are focused on the target, eye dominance is not as big an issue as compared to iron sight. Different people may argue this, but in general I have heard many say it has been a solution for them.
Get use to the Movement
One of the challenges is the perceived shake or movement. When you use iron sights you might see a sight move, but it is not that distracting. When you use a Red Dot, the movement appears to be worse. Remember the Red Dot is the projection of where the dot is at the target in essence. As a result, it really is showing you how much you move. Some people find this distracting until they get used to it.
Where is the Dot?
I think one of the biggest challenges for people that just start shooting with a Red Dot is trying to find it on the glass. You will see them doing circles or “angling” the gun up or down to try and find the dot. There are a couple things that fix this.
- Practice: If you are consistent with your presentation, you will see the dot each and every time.
- Tall sights: Some guns and Red Dot sights allow the combined use of Red Dots and Iron Sights. The Iron sights would be tall enough to be able to see them through the glass. If you align the sights, you will see the dot. This also acts as a back up in case the electronics fail.
- Front sight: Another option is to pick up just the front sight in the glass, center it low in the glass then start raising the muzzle and you should see the dot.
The key to consistently finding the dot is to practice and get use to the presentation. This will make you quicker and more accurate.
Stigmatism
If you are like me and have a Stigmatism you know from driving at night and you see star bursts when cars drive at you vs just two head lights, that looking at a red dot can actually look like a big fuzzy blob rather than a clean small dot. There are some brands that supposedly do better like Holosun, but the best thing I have found to do is lower the brightness of the dot and it helps quite a bit.
Give it a “shot”
If you haven’t had a chance to shoot a Red Dot, give it a try. The technology has come a long way to include durability and battery life. They can help keep someone with aging eyes like mine continue to enjoy the shooting sports and allow me to continue to be defensive ready. See ya on the firing line!

Defensive Flashlights
There are hundreds of flashlight options out there with all kinds of price tags. So which one is right for you?

Photo courtesy of amir shamsipur @amir_shamsipur
A flashlight has a ton of uses besides self-defense and if you don’t have one that you routinely carry I highly recommend one! There are hundreds of options out there with all kinds of price tags so where do you begin to see what is right for you?
Let there be light: How much light do I need? If you are looking for self-defense level lighting, the United States Concealed Carry Association (USCCA) states that 60 lumen is the minimum and is enough to momentarily blind an attacker even in daylight and that 125 lumen is like staring into the sun. Personally, I carry Stream Light Micro Stream which is 250 lumen on its brightest setting, and it seems to work very well for me. At home, I have a 300-lumen and a 500-lumen light.
Is there such a thing as too bright? Maybe. Remember if it is dark enough for you to need a flashlight then you can get blinded by a flashlight at night. If you are inside and shine your light on a wall that you are facing, the reflection might blind you if it is too bright. I think there is a sweet spot between 150 and 300 lumens but that is my opinion. You might want to see it for yourself.
I recommend that you look at flashlights with maybe two settings. One high (the first click when you turn the flashlight on) and one low the second click. You want the highest on the first so if you need it to blind an attacker the first momentary push of the button gives you the brightest setting. The low level you can use in the restaurant to read the menu without blinding your date. ☺
Light Show: There are lights out there that offer strobe settings and different light settings etc. I am a big fan of keeping my everyday carry equipment simple. If I need it in a hurry, I don’t want to have to remember how to turn on my flashlight to the right setting. Things like rotating tail caps for light settings scare me and I just want a simple button. Strobe may work on bad guys but remember you are going to see the flash (reflection) as well. My advice, keep it simple and just light the way.
Strike Bezel: On the light end of the flashlight, it is recommended that the bezel is kind of corrugated. This is referred to as a strike bezel. This will help to inflict a little more pain if you need to strike someone. Remember the last thing we want to do is strike someone with our hand. Always try to have something in your hand to strike with, it works better on them and is easier on your hand.
Tail cap activation: The tail cap should be pronounced enough to allow activation with your thumb or your palm to support shooting with the flashlight in your hand. Some tap caps are recessed to prevent accidental activation. While a nice feature, it doesn’t support the need to press the button. Pictured below are two typical methods of activating a flashlight, with the thumb and with your palm or base of your thumb.
Batteries: There are basically 3 different types of power for flashlights. We have regular alkaline batteries (like your Eveready or Duracell), Lithium batteries (like the 123s), and rechargeable batteries.
The old-school alkaline batteries do Ok and are available everywhere if you need to buy some. They do not however typically support the higher power flashlights. They are also susceptible to cold.
Lithium batteries have a super long shelf life and are not susceptible to cold temperatures. They do however burn out quickly (1-2 hours).
Rechargeable batteries have come a long way over the years. I normally was not a fan, but for the past 2 years I have carried the Streamlight Micro Carry USB. It is charged by plugging it into a USB port. It has some great longevity and I use it all the time. The charge port is covered by o-rings so it is pretty water-resistant.
No matter what your choice, make sure you carry it! You will find it comes in more handy than you think and it might even save your life.
By: Scott Sampson

Understanding Cross-Dominance
So you have determined that you’re cross-dominant (left-eye dominant, right-handed, or vice versa). Now what?
So you have determined that you’re cross-dominant (left-eye dominant, right-handed, or vice versa). Now what? There are a ton of theories out there and there is no right or wrong answer. Here are some things for you to consider.
In pistol shooting the Holy Grail is having the axis of the barrel in line with your arm and eye so that your wrist is not bent left or right. This provides several benefits:
This allows for a solid foundation for the recoil. When shooting a semi-automatic the action needs a solid foundation to work against. Not having a solid foundation can lead to malfunctions.
Rapid acquisition of target. When the dominant eye and dominant hand are on the same side, it allows for quick alignment on a target because it is a straight line.
Besides losing the benefits above, the challenge of shooting with a bent wrist can be exacerbated if the shooter has weak wrists. Shooting a larger caliber with more recoil could be painful.
So do you switch to your non-dominant hand or do you try to make things work? The answer is it depends. Let’s take a look at some thoughts. Again there is no right or wrong answer, each person is unique and you have to consider the options and figure out which is best for you.
Target shooting/competitive shooting games like Bullseye (no drawing from a holster but shooting for accuracy) then I would recommend that you switch to the hand your dominant eye is on.
Self Defense/action competitive shooting games like International Defensive pistol shooting which require drawing from a holster and reloading etc will require finer motor skills under stress. It might be better to stick with shooting with your dominant hand.
Shooting experience is another factor to consider if you have been shooting cross dominant or carrying a gun for years, then I would not recommend that you switch.
If you want to hold the gun with your dominant hand, there are several solutions that are out there and you need to figure out what is right for you. The solutions typically boil down to doing something with your eyes or doing something with your hands. Either approach has its challenges.
Let’s take a look at some of the eye/head options. Some approaches are:
A. Close the dominant eye – This works well, but it has a couple of things to consider. It minimizes your peripheral vision which if in a personal defense situation could be detrimental. If shooting at the range, it makes your face tired. Some options for the range to minimize face muscle fatigue are:
a. Piece of tape over the dominant eye – semi-translucent scotch tape is the best but any will do.
b. An occluder - This is a flip-down eye patch that clips onto your safety glasses. These are used in shooting competitions quite frequently.
c. Squint – sometimes just squinting or partially closing your dominant eye is enough to allow your non-dominant eye to take over.
B. Move the head – Here you are moving your head so that the dominant eye is line with the sights. This is done typically through two methods.
a. Rotating the head – If you are right-handed and left-eye dominant, rotate your head to the right about 15 degrees (ie move your chin towards your right shoulder) so that your left eye is in alignment with the sights when your right arm/hand are extended straight out. This reduces your peripheral vision to one side of the target.
b. Titling the head – The famous Jeff Cooper used this method of tilting your head slightly to the side. If right-handed and left-eye dominant you would tilt your head so as to align the left eye with the gun in the right hand. Here you are actually tilting your head to the side so that your right ear is closer to your right shoulder.
Now let’s take a look at the gun options.
A. Rotate the gun – Leave the gun in your dominant hand but rotate the gun about 30 degrees to align the sights to your dominant eye. For a right-handed - left-eye dominant shooter, the top of the gun would be rotated to the left (counterclockwise) to align the sights in front of the left eye. This allows the wrist to remain straight reasonably straight.
B. Move the gun – move the gun so it is in front of the dominant eye. This will cause the wrist to be bent and possibly lead to several issues. Users of this method should have strong wrists.
C. Center Axis Relock (CAR) method – This is a change in stance that allows the gun to be rotated with bent arms to align easily with either eye.
Another option is to shoot with your weak hand – This has pros and cons and is highly debated. If you are going to target shoot only, switching hands is a reasonable alternative. You especially may want to consider it if you are left-handed. Many guns, especially revolvers are built for right-handed people. If you are left-handed and not going to carry a gun for self-defense, then switching hands is a very reasonable option.
If however, you are going to be carrying a gun for personal defense, most people in a crisis situation will react without thinking. If you are naturally right-handed then that is what you typically are going to want to use to shoot unless you do a lot of practicing. The last thing you want to do is have to stop and think about shooting with your left hand. Keep in mind however that in a crisis situation, however, your weak hand is still doing a lot of things (reloading, racking the slide, supporting the strong hand, operating a flashlight, etc). It isn’t like you aren’t counting on it. It really is a matter of practice.
You may want to consider how long you have been shooting. If you haven’t really started then you haven’t gotten used to shooting so it might not be that bad as you don’t have much muscle memory. If you have been shooting for a long time, then switching hands may not be the best answer for you.
By: Scott Sampson
Copyright 2014

Why You Should Carry A Range Bag
Let’s examine the minimum requirements for a range bag for the average range guest.

I walked into my local gun range a few days ago and held the door open for another guest who was carrying his pistol in a grocery bag.
I could hear his pistol as well as his magazines banging against each other. I also noticed later he had forgotten his ear protection and had to ask his lane neighbor for a disposable pair.
When I got settled in my lane, to my right I found the opposite of the guest I held the door opened for. The shooter to my right had more than a range bag. He had the equivalent of an airline luggage.
His bag had wheels, several handles, multiple pockets, and compartments, USB ports, battery pack, and who know what else. Somewhere between these two extremes of range bags, the average range bag must exist.
Over the next few paragraphs, let us examine what I consider the minimum requirements for a range bag for the average range guest.
The Medical Kit
Let’s start with an item commonly absent from most range bags…the Medical Kit. In case of an emergency, this kit will be the go-to tool to address a medical issue while the emergency personnel is enroute.
At the very minimum it should contain the following:
· Torniquet
· Hemostatic gauze
· Rolled bandage
· Medical gloves
· Band aids
· Shears
· Alcohol pads
An important issue to keep in mind is that a medical kit needs to be kept current as alcohol pads can dry out with time.
The user must be familiar how to use the torniquet, hemostatic gauze, as well as how to put on and take off medical gloves. Please seek out a trauma class.
Hearing and Eye Protection
The key aspect when using hearing and eye protection is fit. If they do not fit, you will not want to wear them and you will not be comfortable.
If you are uncomfortable, you will not enjoy your time at the range. Just like most things associated with firearms, buy quality once and never have to buy the items again.
Ammo and Spare Magazines
Do not wait to get your ammo until you get to the range as the range may not carry your ammo.
Buy your ammo in quantity and bring to the range what your range evolution will require.
Having extra magazines will make your range time more efficient. Load your magazines at home to increase your time shooting vs loading.
Targets, Staple Gun, Marker
The targets will be dependent on, once again, the type of training evolution you plan to exercise at the range.
Simple 12-inch diameter paper plate or IDPA target and anything in between must be part of your inventory.
Plan ahead or you may be purchasing what is available versus what your training plan calls for.
Tools and a Flashlight
The tools should be specific to the firearm (small screwdriver, allen wrenches, CLP, small packable cleaning kit) you will be using at the range.
The flashlight will be of tremendous help if a repair is necessary or just looking for something you may have dropped on the floor or inside the bag.
Miscellaneous
The rest of items you may want to consider may not be a requirement like the ones listed above but may enhance your range experience.
Some empty chamber indicators, snaps caps, a note pad and a pen for recording notes about your training session.
While the above list will not demand an airline-size luggage bag, a grocery bag is also not adequate. Your firearm is an investment in your safety, protect it with a dedicated range bag.
By : Eddie Montero
Sampson Consulting LLC / Client Services and Community Outreach Coordinator